Monday, October 26, 2009

Chocolate Truffles!!!


I have been wanting to make truffles since forever. And seeing as my life has been way too busy to cook, take pictures and write on this website (believe me, pictures of food after 9pm with a flash = no good)...I finally made myself take on this challenge.

I did a bit of research on truffles in general, and it seemed like the filling was normally melted chocolate whipped with heavy cream and sugar. So I got to thinking, well...I have used Tofutti cream cheese in a pasta sauce instead of cream before....so maybe that would work out ok. I did a bit more digging, and it I found several instances of vegan truffles where cream cheese and powdered sugar had been used. Three cups of powdered sugar to be clear.....not what I had in mind.

So I used the basic principles of truffles, and experimented a bit, only using 1 cup of powdered sugar, and it turned out fantastic! And I must say, I cannot even imagine these any sweeter. In fact, I was worried the chocolate filling would be too sweet as it were, which is why I used unsweetened baking chocolate for the outside layer....I liked the idea of having a somewhat dark, non-sweet outer layer with a sweet and creamy inside.

Also, having the truffles not be little balls of sugary, chocolately goo....it doesn't leave you with that....oh my gosh, I just ate a 1/4 cup of sugar, my stomach hurts kinda feeling. You might even feel up to having another one, in fact!

Here is what you will need for the filling:
8 oz. of semi sweet chocolate
1 - 8 oz tub of Tofutti cream cheese, plain
1 cup powdered sugar
1 tsp. vanilla

For the outside:
8 oz Unsweetened chocolate
any toppings that you love!

Also, make sure to have parchment paper on hand!

You start by making the filling, since this will need to be in the fridge and cool for about 2 hours to harden up a bit. This allows you to shape them into tablespoon sized balls. Begin by putting the Tofutti cream cheese into a food processer and mix it until it becomes smoother, and a little less stiff. Add your powdered sugar to this and mix, it will turn into a thick, paste almost. I was a bit surprised at how the powdered sugar changed the cream cheese, but it is normal. Add your vanilla, and mix until smooth.

Set up a simple double boiler, and add your 8 oz of semi sweet chocolate, and stir until it is all smooth and melted, no clumps. I used baking chocolate, which came premade into 1 oz squares, which easily allows you to half the recipe. Also, it made the melting go a whole lot faster having 8 squares of chocolate.

Add your chocolate mixture to your sugar/cream cheese mixture and combine in a bowl. Mix very well, it took a bit of work to combine them and make sure there were no chocolate or white chunks. Put in the fridge and let chill for about 2 hours.

Sugared Cream Cheese & Chocolate Filling

You can do something fun now, take a break, relax. But only for about 2 hours. Fast forward and you are ready to make your truffles! Take a long sheet of parchment paper, and lay it out next to where you are working in the kitchen. Use a tablespoon sized spoon to scoop out your filling, and roll them into balls.

*eta: Once you have finished rolling up your chocolate filling, place them back in the freezer while melting the next batch of chocolate for the coating. This will help the balls keep their shape and are much easier to handle* Set up a double boiler again, and this time, melt your unsweetened chocolate, stirring as it starts to melt so all the clumps get melted away too. Once you have a smooth mixture, take each little rolled up filling mixture and drop it into the chocolate in the double boiler. Make sure the whole thing is coated and set it back down onto the parchment paper. After you do maybe 4 or 5, take a second and add any toppings to the truffles.

Once you have finished all of your truffles, put them into the freezer for 20 minutes, if you want a quick fix to see how amazing your truffles taste. Or simply put them in the fridge until the the chocolate shell has hardened.

Eat, enjoy, repeat!

Here are some toppings I put on my truffles:


Sea Salted Truffles


Purple Sprinkled Truffles
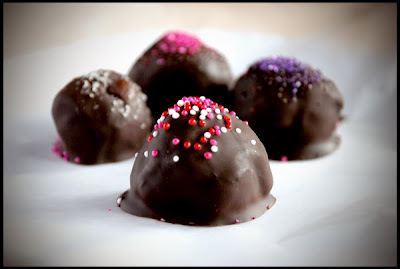

Spotted Truffles


Pink Sprinkled Truffles

Tuesday, October 13, 2009

Nutmeg Cake


For the past couple of months, I have had a growing obsession with nutmeg. I add it to almost everything I make lately, especially anything tomato based. The flavor of nutmeg with a slow, simmering pot of fresh tomatoes make the most excellent pasta sauce.

So you can imagine my delight when I stumbled upon a recipe for Nutmeg Cake! I had to try it out right away. This vegan version is adapted from "The Herb and Spice Bible" along with my own Pumpkin Spice drizzle.

What you will need for the cake:
2 cups flour
2 cups brown sugar
1 tbsp baking powder
1 tsp salt
2 tsp cinnamon
1 tsp allspice
1 tsp coriander
2 tsp fresh ground nutmeg
1/2 cup Earth Balance, or your fav. vegan butter
1 egg equivalent
1 1/4 c. soy milk

Pumpkin Spice Drizzle:
1 c. confectioners sugar
2-3 tbsp soy milk
1- 2 tsp pumpkin spice

Preheat your over to 350 degrees and mix together 1/2 of your flour, all of your sugar, cinnamon, allspice and coriander. Add your 1/2 c. Earth Balance or vegan butter to the mix, and crumble the pieces of butter with the mixture. It will be somewhat coarse and chunky, and that is a-ok.

Spread a bit of Earth Balance onto the bottom of your pan. I used a bundt pan, but an 8 inch round cake pan will work nicely as well.

Sprinkle the flour, sugar, spice, butter combo onto the bottom of you pan to coat it. Whatever you have leftover, add your other 1 cup flour to this mixture, add your baking powder, salt, nutmeg, soy milk and egg equivalent and whisk together.

Pour this batter over the crumbs in your pan, and bake for 50-60 minutes. Depending on what kind of pan you use, your baking time will vary slightly, so keep an eye on your cake at around the 50 minute mark. The cake is done when you can insert a fork into it and it comes out clean, it should also feel springy to the touch.


While you let your cake cool in the pan, prepare your Pumpkin Spice drizzle. Mix all ingredients together, and adjust the amount of soy milk until you get a somewhat thick liquid. Set aside.

Remove cake from pan, and drizzle the Pumpkin Spice drizzle over the cake. And if you are feeling festive like I was, decorate your nutmeg cake with autumn colored sprinkles!

Saturday, October 10, 2009

German Knäckebrot


I brought home some delicious Knäckebrot when I came back from Germany at the end of the summer, and I knew right away that this would be something I would have to tackle, and try making myself. The word Knäckebrot literally translates to "crisp bread" and that is pretty much what it is. A thin, crispy bread that is amost like a cracker.

The Knäckebrot I brought was something the bakery down the street at my Oma's house made daily, and it had lots of good seeds on it. It is super good with things like hummus.


Here is my own version of it, for which you'll need:
1/2 c. rye flour
1 1/2 c. white flour
2 tbsp. Earth Balance
1 tbsp baking powder
1 tsp salt
1/2 c. water
sesame seeds
raw sunflower seeds

Mix all of the ingredients, minus the seeds, until the dough is smooth, yet a tad sticky. Add 2 tbsp. sesame seeds to the dough. Preheat oven to 425 degrees.

Let rest for 20 minutes. Take about a handful sized ball of the dough and roll out into a 1/8 thin rectangular shape. Sprinkle on the sunflower seeds, and make sure to press them firmly into the dough. Sprinkle sesame seeds on top, and press those into the dough firmly again. If you do not do this step sufficiently, your Knäckebrot will bake, and the seeds will simple fall off. And you do not want that to happen.

Also, be sure to take a fork and poke lots of holes into the dough, that way it stays flat while baking, and you don't end up with a flat bread that has lots of puffy areas.

Bake for about 18 minutes, and check on your Knäckebrot, let it bake until the edges are golden brown. You might end up baking them for a total of 20 minutues, but towards the end, you want to keep an eye on them, so they do not burn.


Serve plain, with jam, hummus, any sort of spreadable goodness and enjoy!

Wednesday, October 7, 2009

Vegan Mofo - Pantry Raid

Today I decided to make something really delicious, something that would use up odds and ends in my pantry, and something that falls into the "comfort foods" category. And what happened was a Chili Soup....something that almost wants to be chili, but is a bit more soupy.


What you'll need:
24 oz. canned diced tomates
24 oz. veggie broth
1 small can of tomato paste
1 green pepper, chopped
1 onion, chopped
4 cups of your favorite beans
4-5 cloves of garlic, minced
salt/pepper to taste
hot sauce!

Also, out of extra comfort foodiness, I made this all in my crock pot. And this is the easier thing ever to make. Just add all of your ingredients into the crock pot, set it to high, and about 4-5 hours later...voila! A meal, ready for you and your loved ones! And it tastes extra good, since it has been simmering all day long, basically.

This is also a great basic recipe, since you can add whatever veggies you have on hand, whatever beans you have sitting around (I used garbanzo and black beans in mine...just what I had hanging around my kitchen). Each time, it can be totally customizable to use up your leftover veggies, as long as you have some canned tomatoes around. Which I always seem to have on hand too.

And I like the fact it has almost a double comfort food aspect to me...chili...and soup. Become one. Amazing!

Tuesday, October 6, 2009

Spiced Chai Concentrate Mix

First, I have to say a big THANK YOU to everyone that watched and enjoyed the Cookie Love! animation! It was a lot of fun, and I have to say thanks to Chris for helping out and doing the wonderful and amazing music for the animation!

Also, a few people were wondering what recipe I used for the cookies. I used the chocolate chip cookie recipe out of Vegan with a Vengeance. I did use carob chips for the cookies though.

So, here in the Northwest it is really starting to change seasons here, the weather outside feels brisk and it gets dark super early! Along with my notorious pumpkin spice anything addiction, I also feel the need to drink chai non stop.

Those concentrate mixes sure add up though at around $4-5 per box. So I decided to do some reading, and try my hand at making my own concentrate. The first batch was ok. I didn't have cardmom, and it was a bit on the bland side. I like my chai a bit spicy!

Here is what you will need:
(makes 6 cups concentrate, enough for about 12 cups of chai w/soy milk)

6 black tea bags
6 cups water
1/2 tsp nutmeg
3/4 tsp ginger
3/4 tsp cloves
3/4 tsp cardamom
2 tsp cinnamon
1 tsp vanilla
5 tbsp agave nectar

Start by bringing your water to a boil and steep the tea bags for a few minutes. Keep the water on medium low heat. Add your spices and the agave nectar, and for the next 20 minutes, keep an eye on your mix, making sure to stir it several times a minute. It should start to thicken up a little bit. I did however take my tea bags out after maybe 10 minutes.

After you have cooked the concentrate for 20 minutes, take a fine mesh strainer to get out all of the spice gunk, so you will only be drinking the delicious chai you have been working so hard for.

Pour your mixture into a larger container, and now, add the vanilla to the mix. Refrigerate. And enjoy whenever you want! Just mix 1/2 of the chai with 1/2 of your fav non-dairy milk, drink it cold or hot, either way, it tastes great.

Spice Tip: buy a little bit of the cardamom from your bulk section. You only need a little bit for each batch, and I think a jar of cardamom sells for around $15!! crazy, right? So buy bulk to save even more money.

Also, if you are thinking about leaving out the cardamom, thats ok. I made my first batch without it too, and it tasted pretty good. Adding the cardamom really brings home the true chai flavor though, it is hard to explain without having your very own personal taste test. But experiment, and adjust to your taste!

One more thing, even though this takes a bit of time, it smells amazing while you are making it, and makes the whole house smell wonderful and cozy, perfect for the fall.


Sunday, October 4, 2009

Cookie Love!

Here is an animation I made today, in honor of Vegan Mofo, with original music by Chris.

Enjoy!

Cookie Love! from jenny konopinski on Vimeo.

Thursday, October 1, 2009

Vegan Mofo!

Today officially marks the beginning of the Vegan Month of Food, woohoo! Vegan Mofo is in its third year this year, with over 300 participants, where bloggers from all over the word try and blog about as much vegan food and other related topics as possible. So prepare yourself with a month of food awesomeness, and hopefully lots of it! This is my first go along with the Vegan Mofo team, so we will see how things go.

Also, if things work out as planned, stay tuned for some sort of cooking/baking stop motion animation I will be working on over the weekend.